Domande frequenti per argomento
Componenti di protezione e le loro impostazioni
Componenti del programma
Dr.Web Security Space per Windows include molti componenti. Quale di essi mi protegge dai virus e quali moduli sono solo ausiliari?
Antivirus Dr.Web è un intero complesso di programmi (moduli) ciascuno di cui è responsabile della propria "zona di difesa" del computer. La rimozione (l'assenza) o la disattivazione di almeno un componente di protezione riduce significativamente l'affidabilità della protezione antivirus in generale, pertanto, consigliamo vivamente di non disattivare, se non assolutamente necessario, nessuno dei moduli.
Programmi ausiliari parte dell'antivirus complesso sono Utility di aggiornamento automatico e Scheduler.
Dr.Web solo rimuove i programmi trojan? Non li cura?
Per la risposta a questa domanda, è necessario capire la differenza tra un oggetto infettato da un virus e un software malevolo.
Di regola, un virus aggiunge (scrive) il proprio codice al file che viene infettato, e in questo modo, un file infettato è composto dalla parte "sana" e da quella infetta, ad esso aggiunta. Insieme rappresentano un file infettato da un virus. Antivirus Dr.Web è in grado di curare (e cura) la maggior parte di tali file. E si tratta non della "cura di un virus", ma della "cura del file" infettato da un virus.
Un software malevolo, malware (ingl. malicious software) esso stesso è un programma per computer completo, pertanto, per esso non è prevista la cura — solo la rimozione. In alcuni casi, possiamo parlare della possibilità di curare il sistema (ma non il software malevolo), la cura consiste, in particolare, nel rimuovere la minaccia trovata, nonché nel ripristinare gli oggetti danneggiati.
Ho il sospetto che sul mio computer si sia infiltrato un virus. Come si fa ad avviare lo scanner?
Ci sono diversi modi per avviare lo scanner.
- Trovare sul Desktop l'icona con un ragno su sfondo verde — Scanner Dr.Web. Avviare lo scanner facendo doppio clic sull'icona.
- Aprire il menu Dr.Web (clic con il tasto destro sull'icona dell'antivirus nell'angolo in basso a destra dello schermo) e selezionare la voce Centro sicurezza. In seguito selezionare la voce File e rete, e quindi Scanner. Selezionare la modalità di scansione richiesta: rapida, completa o personalizzata.
- Per controllare un oggetto specifico (file o cartella), fare clic su di esso con il tasto destro del mouse. Dal menu contestuale che si è aperto, selezionare la voce Controlla con Dr.Web con un'icona a forma di ragno nero su sfondo grigio. Lo scanner si avvierà immediatamente, e il file verrà controllato.
Nelle impostazioni dello scanner c'è un'azione sui file sospetti e incurabili — "Sposta in quarantena". Tali file vengono spostati da qualche parte sul mio computer? Cioè, esso resta infetto?
L'azione "Sposta" per gli oggetti sospetti e incurabili significa spostare un file in una cartella di quarantena speciale. Con lo spostamento, il file perde la sua estensione. Tali azioni significano il vero e proprio "disarmo" del virus, lo rendono invalido e, di conseguenza, innocuo. In seguito è possibile aprire Gestione quarantena (Centro sicurezza → Strumenti → Gestione quarantena) e rimuovere i file se non sono più necessari.
Forse, si potrebbe disattivare il monitoraggio di posta antivirus SpIDer Mail in quanto anche lo scanner controlla i file di email?
Scanner Dr.Web in effetti può rilevare virus nelle caselle di posta di alcuni formati, tuttavia, il monitoraggio di posta SpIDer Mail ha una serie di vantaggi rispetto ad esso:
- Non tutti i formati di caselle di posta popolari sono supportati da Scanner Dr.Web, mentre se viene utilizzato il monitoraggio di posta SpIDer Mail, le email infette non arrivano nemmeno alle caselle di posta;
- Scanner Dr.Web controlla le caselle di posta solo su richiesta dell'utente o secondo un calendario e non al momento della ricezione della posta, per giunta, questa operazione consuma molte risorse e richiede molto tempo.
Pertanto, con le impostazioni predefinite di tutti i componenti Dr.Web, il monitoraggio di posta SpIDer Mail è il primo a rilevare e impedire l'infiltrazione sul computer dei virus e degli oggetti sospetti che si diffondono via email. Il suo funzionamento è molto economico in termini di consumo di risorse di calcolo; gli altri componenti possono non essere utilizzati per il controllo dei file di posta.
Utilizzo un programma di posta molto raro. Mi protegge in tale caso uno dei componenti dell'antivirus — SpIDer Mail?
Il monitoraggio di posta SpIDer Mail controllerà sia la posta in entrata che quella in uscita sul computer indipendentemente dal client di posta utilizzato.
Impostazioni
Ho dimenticato la password dell'antivirus, come posso ripristinarla?
Le istruzioni sono destinate agli utenti di Dr.Web Security Suite e Antivirus Dr.Web delle versioni attuali per la piattaforma Windows.
Le tecnologie utilizzate nei prodotti Dr.Web sono progettate per garantire che i dati utente, compresa la password, non possano essere ottenuti dai malintenzionati. La password non è memorizzata in chiaro da nessuna parte, quindi non è possibile ripristinarla.
L'azienda Doctor Web inoltre non raccoglie dati personali degli utenti e pertanto non può ripristinare la password attraverso una richiesta al servizio di supporto.
Per poter ottenere l'accesso alle impostazioni dell'antivirus, è necessario reinstallare il prodotto utilizzato. Le impostazioni definite, inclusa la password, andranno perse.
- Salvare il file della chiave Dr.Web (il file con l'estensione key con le informazioni sulla licenza). Si trova nella directory C:\Program Files\DrWeb. Per esempio, collocarlo sul Desktop.
- Per reinstallare Dr.Web, è richiesto il suo pacchetto di installazione. Scaricarlo nel Download guidato. Indicare il numero di serie o il file della chiave — il file con l'estensione key con le informazioni sulla licenza (si trova nella directory C:\Program Files\DrWeb) e l'indirizzo email di registrazione, fare clic sul pulsante Scarica. Nella finestra aperta sarà già selezionata la variante di download per Windows e Android, perciò basta fare clic sul pulsante Invia. Nel passaggio successivo selezionare per il download la versione:
- 11.5, se si utilizza il sistema operativo Windows XP;
- 12, se si utilizza il sistema operativo Windows Vista e superiori.
Dr.Web non supporta le versioni inferiori a Windows XP.
Scaricare il pacchetto di installazione Dr.Web.
Rimuovere l'antivirus.
Entrare nel Pannello di controllo selezionando consecutivamente Start → Trova → Pannello di controllo e quindi a seconda del tipo di Pannello di controllo — Programmi o Disinstalla un programma.
Selezionare nella lista dei programmi Antivirus Dr.Web o Dr.Web Security Space, premere Disinstalla e seguire le indicazioni della rimozione guidata.
Durante la rimozione nella finestra Parametri da conservare togliere il flag Impostazioni.

Dopo il completamento della rimozione della soluzione utilizzata riavviare il computer e installare nuovamente Dr.Web. Il file della chiave verrà caricato in automatico.
Se il file della chiave non verrà caricato in automatico durante l'installazione, indicarlo manualmente. Per questo scopo selezionare Licenze nel menu dell'antivirus. Nella finestra aperta Gestione licenze fare clic sul pulsante Acquista o attiva nuova licenza, quindi fare clic sulla scritta o indicare il file della chiave, selezionare dal desktop il file della chiave salvato in precedenza — file con un nome che inizia con SL e che ha l'estensione .key.
How can I boot in Windows safe mode?
To enter the safe mode when your PC is booting, press F8 at the moment the computer vendor picture disappears, before Windows logo is displayed. If you can see the Windows logo then you failed to press the button in time. In this case, you need to wait for the Windows system login window to appear, shut down and reboot your PC.
If you managed to press F8 key in time, you will see the Windows boot menu on the screen.
Use arrow keys to select a boot mode you need, and press Enter.
How can I check and change the system date?
To check the date, roll the mouse cursor over the clock icon in the notification area. The system date will be displayed in the pop-up hint. To change the date, do the following: right-click on the clock icon in the notifications area and select Date/time settings in the open menu. In the next window, set the current date and press Ok.
How can I configure Dr.Web so that I can access the protected system remotely?
Dr.Web for Windows 11.5:
- Click on the Dr.Web icon in the notification area (in the lower-right corner of the screen).
- Click on the padlock icon (Administrative mode) to allow the application to launch.
- Click on the gear icon (Settings), and then click on General → Self-protection.
- Toggle off the Block user activity emulation option.

Dr.Web for Windows 12:
- Click on the Dr.Web icon in the notification area (in the lower-right corner of the screen).
- Select Security Center, and click on the padlock icon (Administrative mode) to allow the settings to be changed.
- Click on the gear icon (Settings) in the top-right corner of the installer window, and then click on Self-protection.
- Toggle off the Block user activity emulation option.

You can also toggle off this option during the anti-virus installation process in the Installation parameters section — in the Advanced options tab.

How can I create a Windows XP system registry archive copy?
Press Start–>All programs–>Standard–>Service–>Data archving. The archiving window appears. Press Next, check the Archive files and parameters in the next window and press Next. In the next window, select Allow choosing objects to be archived and press Next. Now, open My computer in the left-hand part of the window, check System State box and press Next. Specify archive file save path and name. Verify the data displayed and press Ready. When the operation is completed, you may close the archiver window.
How can I enable the Scheduler?
Locate the C:\WINDOWS\inf\mstask.inf file right-click it and select Install item. During installation, you might need an OS installation disk. Your PC may need to reboot.
How can I export a registry tree?
press Start–>Run and enter the the following command in the open line
reg export "tree" file namewhere the “tree” is the registry tree you need to export (tree should be embraced with quotes);
file name is the file where the result will be saved.
For example, you need to export the
HKEY_LOCAL_MACHINE\SYSTEM\CurrentControlSet\Control tree into the C:\result.reg fileThe command will be as follows
reg export "HKEY_LOCAL_MACHINE\SYSTEM\CurrentControlSet\Control" c:\result.reg
How can I know my Windows version?
Press Start–>Run and enter the winver command in the open line.
How can I reset Internet connection settings?
To reset Internet connection settings, press Start–>Run and enter the following command in the open line:
netsh winsock reset
And press Ok.
Note: to restore your previous settings, export the HKEY_LOCAL_MACHINE\SYSTEM\CurrentControlSet\Services\WinSock2 registry tree prior to reset.
I cannor launch an *.exe application. What am I to do?
If the system recovery is enabled on your PC then roll back the system to a checkpoint when this problem did not exist.
If this measure was useless or the system recovery is disabled then try to use a utility located at plstfix.exe.
The disk will not open after viruses have been cured. What am I to do?
Try to use a utility located at plstfix.exe
What is a ticket?
A ticket is a virtual document keeping technical support calls and dialogs between an engineer an user.
What is md5 and how can I get it?
It is a file checksum required to confirm data integrity and authenticity. To get the checksum, use the Hash program or visit forum.drweb.com/hash. When linking, select the file you need with the Browse button and press Compute. When the analysis is over, you will be provided with all the file information, including md5.
Why cannot I install two anti-viruses on one PC?
It is not allowed to install several anti-virus programs on one PC at a time — they will conflict with each other that may considerably slow down you PC or make it completely non-operational. If you have an anti-virus software already installed on your PC, but intend to install a new product from another vendor, then you need to remove the anti-virus program you have, prior to the installation.
If you wish to install another anti-virus program, you do it at your own risk, and become responsible for all the consequences because the consequences of such installation might be unpredictable including inability of your OS to boot as a result of two or more anti-viruses installed on your PC.
Se viene utilizzato un server proxy per l'accesso alla rete – è necessario configurare in qualche modo la procedura di aggiornamento di Dr.Web Security Space?
Sì, nelle impostazioni di Dr.Web Security Space deve essere indicato il server proxy utilizzato.
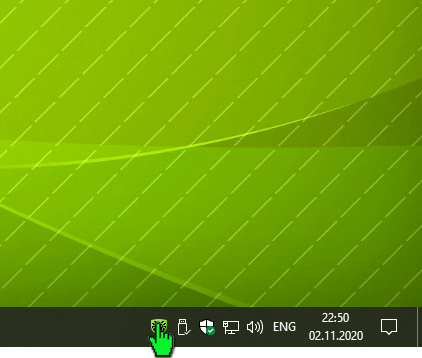
- Fare clic sull'icona Dr.Web
 nell'area di notifica (nell'angolo in basso a destra dello schermo).
 - Selezionare la voce Centro sicurezza, quindi fare clic sull'icona di lucchetto
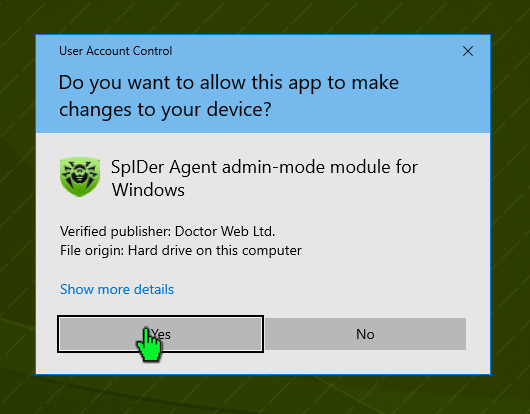
 (Modalità amministratore) nell'angolo in basso a sinistra della finestra che si è aperta, per fornire accesso alle impostazioni, consentire l'avvio dell'applicazione.
 - Se è impostata una password di accesso alla modifica delle impostazioni – inserirla.
- L'icona nell'angolo in basso a sinistra cambierà l'aspetto a
 .
. - Fare clic sull'icona di ingranaggio
 (Impostazioni) nell'angolo superiore destro della finestra, quindi selezionare la voce Rete.
 - Facendo clic, portare l'interruttore Utilizza server proxy in posizione ON. Se i parametri del server proxy non sono stati configurati in precedenza, si aprirà automaticamente la finestra Parametri del server proxy. Altrimenti, fare clic su Modifica.
- Indicare i parametri di connessione.
È possibile modificare i parametri di configurazione di Dr.Web Security Space (in particolare quelli del server proxy) senza avere i permessi di amministratore?
No, non è possibile per motivi di sicurezza. L'assenza di limitazioni all'accesso alle impostazioni potrebbe portare a una situazione in cui un malintenzionato potrebbe modificare le impostazioni dell'antivirus in modo tale che il suo funzionamento venga bloccato.
Come accedere a Centro sicurezza?
Fare clic sull'icona Dr.Web ![]() nell'area di notifica (nell'angolo in basso a destra dello schermo). Se l'icona è assente nella tray, fare clic sul pulsante “freccia verso l'alto”
nell'area di notifica (nell'angolo in basso a destra dello schermo). Se l'icona è assente nella tray, fare clic sul pulsante “freccia verso l'alto”

e sul pannello che si è aperto fare clic sull'icona Dr.Web ![]() .
.

! L'aspetto del pulsante “freccia verso l'alto” può variare in base alla versione del sistema operativo e le sue impostazioni. Così, ad esempio, può avere il seguente aspetto  o
o  .
.
Fare clic sulla voce Centro sicurezza

Se il pulsante ![]() è assente (può essere nascosta dall'amministratore della rete), contattare l'amministratore di sistema o utilizzare il pulsante Start per avviare Centro sicurezza.
è assente (può essere nascosta dall'amministratore della rete), contattare l'amministratore di sistema o utilizzare il pulsante Start per avviare Centro sicurezza.
Premere il pulsante Start (il suo aspetto può variare in base al sistema operativo utilizzato, ma di regola si trova sul bordo inferiore sinistro dello schermo)

Fare clic sulla voce Dr.Web e nella lista che si è aperta cliccare su Centro sicurezza
Si apre la finestra Centro sicurezza. La lista delle voci può variare in base alla versione del prodotto utilizzata.

La lista degli elementi disponibili della finestra può variare in base alla versione del prodotto utilizzata, le impostazioni configurate dall'amministratore della rete.
Di default la possibilità di modificare le impostazioni è bloccata. Per sbloccarla, fare clic sull'icona a forma di lucchetto (Modalità amministratore) nell'angolo in basso a sinistra della finestra. Se è impostata una password di accesso alla modifica delle impostazioni – inserirla.
L'icona nell'angolo in basso a sinistra cambierà l'aspetto a .
Protezione preventiva
Cosa significa il messaggio L'esecuzione di codice non autorizzato è bloccata?
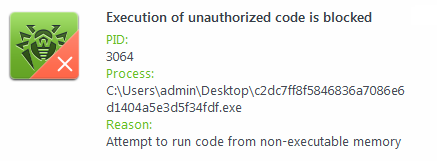
Antivirus Dr.Web può non solo rilevare programmi malevoli già conosciuti, ma anche bloccare l'attività degli strumenti più recenti utilizzati dai malintenzionati. Così, Protezione preventiva Dr.Web monitora gli accessi di tutti i programmi in esecuzione a diverse risorse del computer e in base a regole speciali identifica le azioni che non sono tipiche dei programmi legittimi. In tale caso, il messaggio indica un tentativo di incorporazione di un certo codice in un processo in esecuzione, una cosa che i programmi legittimi fanno molto raramente.
Dunque, Antivirus Dr.Web ha impedito che i malintenzionati utilizzino una vulnerabilità non chiusa sul computer.
Per prevenire tali situazioni, è necessario installare tutti gli aggiornamenti di sicurezza Microsoft correnti sul sistema su cui si è verificato il blocco dell'antivirus. Quindi è necessario riavviare il computer.
Inoltre, si deve assicurarsi che i componenti Dr.Web sono aggiornati allo stato attuale e i database dei virus recano la data corrente.
Per rilevare la minaccia, nelle impostazioni di Protezione preventiva Dr.Web per la voce Integrità delle applicazioni in esecuzione impostare la modalità Chiedi, e inoltre, attivare la modalità interattiva di protezione dagli exploit.
Contattare il servizio di supporto tecnico. Allegare alla richiesta un report dal sistema su cui è installato l'antivirus. A questo scopo, fare clic con il tasto destro del mouse sull'icona Dr.Web nella tray, aprire Centro sicurezza -> Supporto  , fare clic sul pulsante "Vai a Creazione report guidata" e quindi su "Crea report". Attendere la fine della generazione del report. Verrà generato un file con l'estensione .zip — allegarlo alla richiesta.
Creazione report guidata Dr.Web (applicazione dwsysinfo) è un'utility speciale Dr.Web progettata per la raccolta di informazioni sul sistema. Dopo essere avviata, l'utility genera un archivio zip con log di eventi, documenti XML, il file HOSTS e altre informazioni. La lista completa dei dati disponibili nel report può essere consultata al link.
Monitoraggio del traffico web SpIDer Gate
A connection failure occurs when I try to download a program. If I turn off SpIDer Gate, downloading continues without interruptions. What shall I do?
Try running SpIDer Gate with the -dbg: 2 parameter. To do this, click Start-> Run, type in the string provided below:
"C:\Program Files\DrWeb\spidergate.exe" –dbg:2
Click Ok.
If the problem persists, please contact the technical support service.
Can the firewall do Spider Gate's work?
No, SpIDer Gate is an HTTP-monitor. It performs the following tasks:
- Scan incoming and outgoing HTTP-traffic
- Intercept all HTTP-connections
- Filter Data
- Block loading infected pages automatically in any browser
- Scan archived files
- Protect from phishing and other dangerous online resources.
At the same time the firewall protects your PC or network from unauthorized access.
Thus, SpIDer Gate and the firewall must operate simultaneously on your computer to protect your system against viruses and network attacks.
Does SpIDer Gate depend on my browser?
No. SpIDer Gate operates independently of the programs that use the Internet (including browsers).
Does operation of SpIDer Gate slow down web surfing?
Dr.Web anti-virus engine is so fast that SpIDer Gate won’t delay loading of web-pages or slow-down file transfers.
How can I configure SpIDer Gate's verbose log?
For version 5.0:
- Increase log file size up to 5 Megabytes. Right-click on the Dr.Web icon in the notifications area, select SpIDer Gate–>Settings, in the next window proceed to the Log tab and modify the File size limit field value.
- Right-click on the Dr.Web icon in the notifications area and select SpIDer Gate ->Disable.
- Press Start–>Run, copy one of the strings below to the Run field and launch SpIDer Gate:
- "C:\Program Files\DrWeb\spidergate.exe" -dbg — enable verbose logging,
- "C:\Program Files\DrWeb\spidergate.exe" -dbg -dbg — debug logging.
Version 6.0
Right-click on the Dr.Web icon in the notifications area and select SpIDer Gate–>Settings from the list (if this item is unavailable, you should first switch to the Administrator mode). In the next window, open the Log section and use the slider to set the Extended mode. Press Ok to confirm the changes made.

Further, if required, you can reproduce the problem that must be analysed using the extended report. Please keep in mind that the Debug log is not always required because redundant information might complicate troubleshooting.
How can I disable the SpIDer Gate HTTP monitor?
It is not recommended to disable the SpIDer Gate HTTP monitor because nowadays a lot of malware is distributed via infected websites. There are many script viruses and exploits that can cause harm to the system before they are saved to your hard drive and, consequently, detected by the SpIDer Guard® file monitor.
If disabling HTTP monitor is still necessary, right-click on the Dr.Web icon and in the next menu, select SpIDer Gate –> Disable. When anti-virus self-protection screen appears, type digits from the picture into the string and click Disable SpIDer Gate.
How do I disable the HTTP-monitor SpIDer Gate?
Right-click on the Dr.Web icon in the system tray and select SpIDer Gate-> Disable in the context menu.
Caution! It is not recommended to disable the HTTP-monitor SpIDer Gate because nowadays a lot of malware is distributed via infected web sites. There are many script viruses and exploits that can harm the system before they are saved to your hard drive and, consequently, detected by the file monitor SpIDer Guard.
How do I update the HTTP-monitor SpIDer Gate?
Since SpIDer Gate utilizes the Dr.Web engine and databases, it is updated automatically along with other anti-virus modules.
How is SpIDer Gate updated?
As other modules of the program Dr.Web, SpIDer Gate features the same anti-virus engine and uses the same virus databases and therefore is updated along with other modules.
The SpIDer Gate icon is red. What shall I do?
The red icon indicates that SpIDer Gate is disabled. To activate it, right click on the Dr.Web icon in the notification area. In the menu, hover over the SpIDer Gate item and in the drop-down list select Enable.
If the icon remains red, you have two options:
- Application error – in this case you need to contact the Technical support service.
- Your license does not cover SpIDer Gate. In this case, it is recommended to remove the component: Go to Start-> Settings-> Control Panel-> Add and Remove Programs, find the Dr.Web anti-virus on the list, click Modify and follow the wizard's instructions to disable this component.
This script should be used to answer users’ questions.
One of SpIDer Gate’s tasks is to inform users that visiting some websites is dangerous or undesirable, for reasons that include the presence of “pirated” content. Dr.Web informs users about such websites because they are accompanied by malicious programs. Websites are included in the so-called Dr.Web “anti-piracy” database only on the basis of allegations made by content copyright holders. Each allegation is verified by Doctor Web’s lawyers before the decision is made to include the corresponding URL in the database. When users receive SpIDer Gate notifications concerning the undesirability of visiting pirated websites, they are getting objective, legally considered information about intellectual property infringement. Thus, Doctor Web helps users of its products:
- avoid becoming the victims of criminals, who for their own selfish ends use others’ works and trademarks, and the fruits of others’ intellectual labours, for illegal purposes;
- avoid potential criminal indictment for downloading, using, and further distributing pirated content;
- protect PCs against infections occurring as a result of downloading unlicensed content that is accompanied by malicious programs.
Users make their own decisions as to whether it is worth visiting the websites they have been notified about. The SpIDer Gate component can be enabled or disabled at their discretion.
What is the impact of SpIDer Gate on the web-surfing speed?
The unique Dr.Web anti-virus engine allows SpIDer Gate to scan traffic so quickly that you will never notice any delay when viewing web pages and downloading files from the Internet.
When I try to go to some sites, SpIDer Gate blocks them and displays the message "URL is known as a source of infection." How can I disable this feature?
If you believe that SpIDer Gate has mistakenly blocked a respected site, please let us know through the form on our website.
If you need to access a suspicious site, right click on the Dr.Web icon in the system tray and in the context menu select SpIDer Gate-> Settings. Clear the Block known source check box and press Ok.
Caution! Disabling this option is not recommended, because pages from all sites, including potentially dangerous ones will be loaded without a corresponding warning.
Where can I find SpIDer Gate's log?
SpIDer Gate's log file name is spidergate.log. The file is located in the C:\Documents and Settings\Your_user_name\DoctorWeb folder.
Which browsers support SpIDer Gate?
SpIDer Gate is compatible with all web-browsers.
Dr.Web anti-virus engine is so fast that SpIDer Gate won’t delay loading of web-pages or slow-down file transfers.
Why do I need the Speed balance option?
The Speed balance option allows you to adjust the amount of CPU time utilized to scan Internet traffic. The higher the scanning priority, the more CPU resources it will use, but it will help maintain high speed connectivity. Low priority results in low CPU load and slower network communication speed. Changing the default value usually is not required.
Perché Dr.Web Security Space letteralmente divora il traffico? Il traffico del componente dell'antivirus dwnetfilter supera tutto il resto del traffico internet.
Il componente in realtà non consuma traffico. Il traffico passa attraverso questo componente. Quante applicazioni si sono connesse alla rete, quanti dati sono stati ricevuti/inviati tramite la rete, tanto traffico elaborerà il componente.
Tecnicamente si vede così:
Per fornire il controllo del traffico, l'antivirus installa nel sistema protetto i suoi filtri del traffico internet come se fosse un proxy. E questo filtro deve essere il primo in modo che il programma malevolo non possa elaborare per primo il traffico. Ad esempio, ai fini di occultamento della propria trasmissione di dati. Anche i sistemi di monitoraggio di terzi inseriscono filtri di conteggio simili, ma elaborano il traffico dopo il filtro dell'antivirus in quanto tali filtri funzionano sempre in sequenza. Pertanto, il processo dwnetfilter sarà visto come il principale consumatore di traffico.
Il dwnetfilter stesso non va su internet di propria iniziativa, intercetta solo le connessioni degli altri.
Per eliminare il falso effetto del consumo traffico da parte del componente dwnetfilter, è necessario escluderlo dal tracciamento da parte del programma di monitoraggio traffico utilizzato, se esiste tale possibilità. Non ha senso tracciare il traffico delle applicazioni separatamente, nonché il loro traffico complessivo attraverso un proxy (dwnetfilter).
Come aggiungere un sito alle eccezioni SpIDer Gate per Windows
Fare clic sull'icona Dr.Web nell'area di notifica.
Aprire Centro sicurezza Dr.Web.

Per apportare modifiche alle impostazioni Dr.Web, sono necessari i permessi di amministratore Windows. Fare clic sul lucchetto per concederli.

Alla domanda sull'aumento dei permessi rispondere di sì.
Fare clic sul pulsante "Eccezioni".
Fare clic sul pulsante "Siti".
Aggiungere gli indirizzi dei siti l'accesso a cui si vuole consentire. Dopo aver inserito l'indirizzo di un sito, fare clic sul pulsante "+".
Per aggiungere alla lista un sito specifico, inserirne l'indirizzo (per esempio, www.example.com). L'accesso a tutte le risorse situate su questo sito sarà consentito.
Per consentire l'accesso a siti nei cui indirizzi è contenuto un determinato testo, inserire questo testo nel campo. Esempio: se si inserisce il testo example, sarà consentito l'accesso agli indirizzi example.com, example.test.com, test.com/example, test.example222.it e così via;
Per consentire l'accesso a un dominio specifico, indicare il nome del dominio con il carattere ".". In tale caso sarà consentito l'accesso a tutte le risorse situate su questo dominio. Se nell'indicazione del dominio si usa il carattere "/", la parte della sottostringa a sinistra del carattere "/" sarà considerata il nome a dominio e le parti a destra del carattere saranno considerate la parte dell'indirizzo consentito su questo dominio. Esempio: se si inserisce il testo example.com/test, saranno consentiti gli indirizzi example.com/test11, template.example.com/test22 e così via;
Per aggiungere alle eccezioni siti specifici, inserire una maschera che li definisce nel campo di input. Le maschere vengono aggiunte nel formato: mask://...
La maschera imposta la parte generale del nome oggetto, in particolare:
- il carattere "*" sostituisce qualsiasi sequenza di caratteri, anche una vuota;
- il carattere "?" sostituisce qualsiasi carattere, anche uno vuoto, ma uno solo.
Esempi:
mask://*.it/ — si apriranno tutti i siti nella zona .it;
mask://mail — si apriranno tutti i siti in cui è contenuta la parola "mail";
mask://???.it — si apriranno tutti i siti della zona .it di cui i nomi sono composti da tre caratteri o meno.
La stringa inserita al momento dell'aggiunta alla lista può essere trasformata in forma universale. Per esempio, l'indirizzo http://www.example.com verrà trasformato nel record www.example.com.
Parental control
A site I want to visit is blocked by the parental control module. How do I exclude this site from the blocking list?
Add the site's address onto the white list, or if you are sure that the site is blocked by mistake, report the false positive to Doctor Web.
At what address can I report false positives of the Dr.Web Parental control?
Send links to web-site mistakenly rated by the module as undesirable to Doctor Web's laboratory via the web-form on our website.
How can I disable the parental control module?
Right-click on the Dr.Web icon in the notification area and select Parental Control → Settings. Enter the password and select Allow access to all sites. In the Local Access tab, select Allow and Unlimited in the corresponding sections. Click Apply to save the changes.
Caution! Disabling Parental control will allow access to all resources on the Internet, LAN and the PC.
How can I recover a lost password to access the Parental control?
There is no way to recover a Parental control access password. The only solution is to import a new password into the registry from a special file.
- Use the download link to obtain the file
- Disable the anti-virus's self-protection
- Double-click on the downloaded file and agree to modify the registry
- Enable self-protection
- Now your password is "drweb" (without the quotes), do not forget to change it in the Parental control settings.
How do I disable access blocking?
Right-click on the Dr.Web icon in the notification area and select Parental Control → Settings. If this is the first launch of the Parental control module, you will need to set a password for it. Then in the subsequent window select what you want to block and then click Apply.
I am prompted to enter a password to access the parental control. What for?
If the password for parental control is not specified, each time you open parental control settings, you will be prompted to set a password. It is Recommended that you set a password right away to prevent unauthorized access to these settings. If no password is required, click Cancel.
I can not turn on the Parental control, it requires a key file. What do I do?
If upon activating the Parental control you receive the message "Unable to find a key file", it means that your license does not cover the Parental control. In this case, it is recommended to remove the component: Go to Start–> Settings–> Control Panel–> Add and Remove Programs, find the Dr.Web anti-virus on the list, click Modify and follow the wizard's instructions to disable this component.
What is the "Local access" option for?
Use the local access settings to restrict access to resources on your computer - files and folders. In addition, it is possible to prohibit the use of removable storage media and access to the LAN. By restricting access to such resources you can avoid damaging or removing sensitive data by a third party and prevent unauthorized access to confidential information.
What is the parental control for?
The Parental control module allows you to restrict users' access to certain sites on the Internet, local files and folders, local network resources. An administrator can manually configure a list of banned sites or take advantage of the constantly updated thematic lists provided by Doctor Web.
When I hover the cursor over the Dr.Web icon in the notification area, the tooltip says that local access protection and URL filtering are disabled. What does this mean and is it dangerous?
Local access protection and the URL filter are parental control features disabled by default. You need to activate them manually by setting the parental control operation mode and access password in its settings.
Which sites can be blocked with the Parental control module?
The Parental control module can restrict acces to any specific sites or web-pages, as well as to all known sites containing information on certain subjects (such as sites about drugs or weapons, sites of paid on-line games, etc.). A list of specific websites to be blocked is set up by the user; both individual addresses and keywords found in URLs can be specified in this block list. Blocking websites by subject is carried out automatically using the lists, updated regularly by Doctor Web.
Will my child be able to disable the Parental control module without my consent?
If you set a password for accessing the Parental Control, only the computer's administrator will be able to do so after entering the password. If no password is set, then any user with administrative privileges will be able to change the settings.
Come limitare l'accesso a siti indesiderati tramite Parental control in Dr.Web per Windows?
- Fare clic sull'immagine di un ragno nella tray di sistema.
- Fare clic sul pulsante con l'immagine di un lucchetto chiuso — il sistema chiederà di elevare i privilegi di accesso.
- Rispondere affermativamente e, se necessario, immettere la password dell'account amministratore. L'immagine di un lucchetto chiuso verrà sostituita dall'immagine di un lucchetto aperto.
- Fare clic sul pulsante a forma di ingranaggio.
- Nella finestra delle impostazioni Dr.Web che si è aperta passare alla scheda "Parental control".
- Nella parte destra della finestra selezionare l'account utente per cui si desidera impostare restrizioni.
- Fare clic sul pulsante "Modifica" nella sezione "Internet".
- Da una lista a cascata selezionare la voce "Blocca per categoria".
- Selezionare le categorie di siti indesiderati l'accesso a cui si desidera limitare.
Le liste di siti per ciascuna categoria vengono integrate dagli specialisti Doctor Web.
Scoprite di più
Come in Dr.Web per Windows concedere al bambino l'accesso a singoli siti che sono inclusi in una determinata categoria di blocco o integrare la lista di siti bloccati?
- Passare alla scheda Parental control.
- Nella parte destra della finestra selezionare l'account utente per cui si desidera impostare restrizioni.
- Fare clic sul pulsante Modifica nella sezione Internet.
- Selezionare la modalità di funzionamento Blocca per categoria.
- Fare clic sul pulsante White list e black list.
- Per escludere un sito dal blocco, aggiungere il relativo indirizzo alla white list.
- Per aggiungere un sito alla lista di quelli indesiderati, aggiungere il relativo indirizzo alla black list.
- Se si vuole che l'utente abbia accesso solo a determinati siti — aggiungere gli indirizzi di questi siti alla white list e selezionare la modalità di funzionamento Blocca tutti eccetto i siti inclusi nella white list.
I motori di ricerca popolari (Google, Yandex) hanno la funzione di ricerca sicura che permette di escludere dai risultati di ricerca link di siti con contenuti pericolosi o indesiderati. Affinché il browser attivi automaticamente la funzione di ricerca sicura, attivare l'omonima funzione di Parental control.
Scoprite di più
Come limitare l'accesso a singoli file o cartelle tramite Parental control in Dr.Web per Windows?
- Aprire la scheda File e cartelle e fare clic sull'interruttore.
- Aggiungere alla lista percorsi di file e cartelle e quindi selezionare la modalità di accesso adatta.
"Sola lettura" significa che il bambino potrà leggere file e cartelle, ma non li potrà modificare o cancellare;
"Bloccati" non permetterà affatto al bambino di accedere a file e cartelle.
Come proteggere le impostazioni di Parental control in Dr.Web per Windows da modifiche da parte di terzi?
- Fare clic sul pulsante "Start" — "Impostazioni".
- Aprire la sezione "Account".
- Passare alla sottosezione "Famiglia e altri utenti".
- Assicurarsi che gli account degli utenti per cui sono state configurate le restrizioni in Parental control non abbiano permessi di amministratore.
- Se necessario, cambiare i permessi degli utenti da "Amministratore" a "Utente normale".
- Assicurarsi inoltre che nel proprio account amministratore sia impostata una password non vuota. Se la password è ancora vuota, premere Ctrl + Alt + Canc sulla tastiera e fare clic su "Modifica la password". Immettere una nuova password nei campi "Nuova password" e "Conferma password" e premere il pulsante "Invia".
Come limitare in Parental control in Dr.Web per Windows il tempo in cui il bambino può accedere a Internet o al computer?
- Aprire la scheda "Tempo".
- Tramite la griglia temporale impostare il calendario di accesso a Internet e al computer.
- Invece di impostare la griglia temporale, è possibile selezionare la modalità di funzionamento "Limitazione dell'orario per intervallo".
Scanner
How can I enable a scheduled scan?
In order to launch full scan, please use the Task scheduler.
Windows XP:Open the Windows task scheduler (Start->Control panel->Assigned tasks). Find the Dr.Web Daily Scan task pre-installed during installation and open it to edit. In the Task tab, check Enabled. In the Schedule tab, specify scan frequency and time you need. Press Ok to apply the settings. Enter user name and password upon the operating system request.
Windows Vista/7:In order to edit a task pre-installed during the anti-virus installation, right-click on the Dr.Web icon in the notifications area and select Tools->Scheduler. In the next window, select the Drweb Daily Scan task, which is disabled by default. You should enable it (by right-clicking the task and selecting Enable option). In the Triggers tab, edit launch time and frequency.
I have installed anti-virus on my PC and run the program. Though I did nothing about it, it started to perform itself — some numbers appeared and the progress bar began sliding to the right in the bottom part of the program window. What is it doing?
Quick scan of the critical system objects with the anti-virus scanner is launched automatically as the program starts. It is required to find out if any viruses exist in the system. After the scan is complete, two right windows indicate numbers. The left one shows the number of viruses found on your PC, while the right one — the number of RAM objects and files scanned with the anti-virus scanner.
In the scanner settings, there is an action to process infected and incurable files — Move. Are such files moved to a location on my PC?
The Move action in respect to infected and incurable objects means the following: an object is moved to a special directory specified in the Move to field (by default, it is the infected.!!! subdirectory of the Dr.Web installation directory) and accessible even after the scan is over. Furthermore, after having been moved, the file loses its extension. Such actions mean that the virus is actually “disarmed”, rendered incapable and, therefore, absolutely safe.
What is the scanner designed for? Is SpIDer Guard anti-virus monitor, which always monitors all the calls to files, not enough?
Dr.Web scanner for Windows either scans files at the user’s command or on the schedule specified in the Scheduler. Not all the files are checked, but only those specified in the scanner settings instead. By default, files are checked by format — i.e., files in archives, packed and e-mail files, and RAM and all the autorun objects as well. You may choose to scan disks, folders, scan by file types, by preset mask, or scan all the files. To view current scanner settings, go to the program main window menu bar and select Settings–>Modify settings.
Antispam
How can spam be filtered into definite mail folder?
To move automatically all messages marked as spam by Dr.Web Anti-spam into definite mail folder in your mail client, do the following.
- In SpIDer Mail menu on the Windows Task Panel choose “Settings” – the SpIDer Mail “Settings” window will appear. Press the “Advanced…” button. The “SpIDer Mail® Spam Settings” window will open. Check the “Add prefix to the subjects of the spam messages” box. Input any word or combination of symbols in the field below it. This will be the prefix Dr.Web Anti-spam will add to subjects of messages marked as spam.
- In the mail client you use, make a new folder for spam. Make the rule for this folder so that all the spam messages with the prefix you specified in the “Add prefix to the subjects of the spam messages” filed are placed there automatically.
How to activate Dr.Web spam filter?
Incoming mail filtering is processed by SpIDer Mail, one of Dr.Web modules. The following steps describe how to activate the spam filter:
- In SpIDer Mail menu on the Windows Task Panel choose “Settings” – the SpIDer Mail “Settings” window will appear.
- In the “Scan” pane of the SpIDer Mail “Settings” window enable the “Check for the spam” checkbox and press OK to save the changes made; then close SpIDer Mail “Settings” window.
After you’ve activated your spam filter, SpIDer Mail with Vade Retro anti-spam engine integrated into it starts filtering all your incoming mail on POP3 and IMAP4 protocols.
How to avoid filtering Cyrillic e-mails as spam?
At first all spam messages were of Latin origin and spam-filters’ developers, represented for the most part by Western companies, were aimed at filtering these ones only. Later on spammers switched into Cyrillic, too. But since the bulk of spam is still in Latin, there are some difficulties to filter Cyrillic spam.
To save your Cyrillic correspondence from being filtered as spam without a prior analysis, check the “Allow Cyrillic texts” box. Otherwise such e-mails are likely to be marked as spam. “Allow Chinese, Japanese, Korean text” option works the same way.
How to configure spam filtering to a specific folder in my e-mail client?
To have all the messages marked with Dr.Web spam filter automatically moved to a specific folder — let's call it Spam, for example, — follow the below steps:
- Right-click on the Dr.Web icon in the notifications area and select SpIDer Mail–>Settings. Go to the Anti-spam tab, and check the box next to Add a prefix to the Subject field of e-mails containing spam. In the field below, enter any word or letter combination you like — that's what will be a prefix Dr.Web spam filter will add to the subjects of messages specified to be a spam.
- In your e-mail client, create a folder for spam filtering and configure rule for it so that messages having a prefix you have entered to the Add a prefix to the Subject field of e-mails containing spam be placed into it automatically.
Below are detailed steps on how to set up rules for various e-mail clients. It is assumed that the Anti-spam is configured to mark an incoming spam with the [SPAM] prefix. If you chose an alternative prefix, use it in accordance with this manual...
Microsoft Outlook Express 6
- Create a new folder into which spam will be moved:
- right-click on the account name, and in the context menu select "New Folder...";
- enter the Spam folder name, and click "OK".
- Set a filter rule for messages marked as spam:
- in the menu, select "Tools" - "Rules for messages" - "Mail ...";
- in the first list, check the "Search for messages containing specific words in the "Subject" field;
- in the second list, check the "Move to a specified folder";
- in the "Rule description", click on the "containing specific words";
- enter the [SPAM] key word, and press "Add", then "OK";
- in the "Rule description", click on the "specified";
- select the "Spam" folder created in step 1, and press "OK";
- in the "Rule name", type "Spam filtering", and press "OK" twice.
Microsoft Office Outlook 2003:
- Create a new folder into which spam will be moved:
- right-click on the account name, and in the context menu select "New Folder...";
- enter the Spam folder name, and click "OK".
- Set a filter rule for messages marked as spam:
- in the menu, select "Service" - "Rules and alerts...";
- Go to the "E-mail rules" tab;
- click on "New...";
- select "Create a new rule";
- in Step 1, select the "Check messages upon receipt", then click "Next";
- in Step 1, select "containing
in the "Subject" field; - in Step 2, click on "
"; - in the upper field, enter [SPAM], and press "Add", then "OK" and "Next";
- in Step 1, select "move them to the
folder"; - in Step 2, click on "
"; - select the "Spam" folder created in step 1, and press "OK", then "Next" twice;
- in Step 1, specify the "Spam Filtering" rule name, and click "Finish", then "OK".
Microsoft Office Outlook 2007:
- Create a new folder into which spam will be moved:
- right-click on the account name, and in the context menu select "New Folder...";
- enter the "Spam" folder name, then in the "Folder content" list, select "elements such as Mail"; in the "Place folder into..." tree, choose a location where the "Spam" folder will be stored.
- Set a filter rule for messages marked as spam:
- in the menu, select "Service" - "Rules and alerts...";
- Go to the "E-mail rules" tab;
- click on "New...";
- select "Move all messages containing specific words in the subject field to folder", and click "Next";
- in Step 1, select "containing
in the "Subject" field"; - in Step 2, click on "
"; - in the upper field, enter [SPAM], and press "Add", then "OK" and "Next";
- in Step 1, select "move them to the
folder"; - in Step 2, click on "
"; - select the "Spam" folder created in step 1, and press "OK", then "Next" twice;
- in Step 1, specify the "Spam Filtering" rule name, and click "Finish", then "OK".
Windows Mail 6 (Windows Vista):
- Create a new folder into which spam will be moved:
- right-click on the account name, and in the context menu select "New Folder...";
- enter the "Spam" folder name; in the "Select the folder in which a new folder will be created" tree, select a location where the "Spam" folder wil be stored.
- Set a filter rule for messages marked as spam:
- in the menu, select "Service" - "Message rules " - "Mail...";
- click on "New...";
- in the "1. Select conditions for this rule" list , flag the "Search for messages containing specific words in the "Subject" field";
- in the "2. Select actions for this rule" list, flag the "Move to the specified folder";
- in the "3. Rule Description" field, click on "containing specific words";
- in the "Enter the keywords" dialog box, type [SPAM] in the "Enter keywords or sentence and click" Add"" field, press "Add", then "OK";
- in the "3. Rule Description" field, click on "specified";
- in the next "Move" window, select the "Spam" folder created in step 1, and press "OK";
- in the "4. Rule name" field, type "Spam Filtering" and click "OK" twice.
Ritlabs The Bat! 4
- Create a new folder into which spam will be moved:
- right-click on the account name, and in the context menu select "New" - "New Folder...";
- enter the Spam folder name, and click "OK".
- Set a filter rule for messages marked by anti-spam as spam:
- right-click on the account name, and in the context menu select "Inbox Assistant settings...";
- right-click on the "Incoming mail", and in the context menu, select "New rule";
- in the "Name" field, enter "Spam filter";
- click on "Sender" and choose the "Subject" line from the drop-down list;
- enter [SPAM] into the field after the word "containing"
- under the "Actions" list, click "Add";
- in the drop-down list, select the "Move message to folder";
- in the folder tree, select the "Spam" folder created in step 1, and click "OK" twice.
Mozilla Thunderbird 2.0
- Create a new folder into which spam will be moved:
- right-click on the account name, and in the context menu select "New Folder...";
- enter the Spam folder name, and click "OK".
- Set a filter rule for messages marked by anti-spam as spam:
- select the account name in the tree of accounts and folders;
- in the menu, select "Tools" - "Message Filters...";
- press "Create...";
- in the "Filter name" field, enter "Spam filter";
- in the list below, sequentially select "Subject", then "contains" from the drop-down lists; in the right-hand field, enter [SPAM];
- from the drop-down lists in the list far below, sequentially select "Move message to...", and in the next box, select the "Spam" folder created in step 1, then press "OK";
- close the "Message filters" window.
How to manage Whitelists\Blacklists?
Whitelists and Blacklists contain mail addresses you either trust or not.
- If the sender’s e-mail address is added to the Whitelist, these messages are not filtered. However, if the sender and the receiver share the same domain name e-mail addresses and this domain name is enlisted in the Whitelist with the “*” symbol, it is filtered for spam.
- All messages enlisted in Blacklist are marked as spam without additional analysis.
Both lists settings should be fill in one after another, parted by “;”. The “*” sign can be used as a part of e-mail address. For example, *@domain.org passes for all addresses with “domain.org” domain name.
Where to forward e-mails falsely marked as spam/non-spam?
In case some messages are falsely filtered, they should be forwarded as attachments to special addresses for analysis and correction of spam-filtering techniques.
- Messages, falsely marked as spam , should be forwarded as attachments to nonspam@drweb.com
- Messages, falsely marked as non-spam , should be forwarded as attachments to spam@drweb.com.
Which messages are filtered by Dr.Web anti-spam as unwanted?
- To make it short, let’s apply “spam” name to all unsolicited e-mails. The bulk of it comprises advertisements offering different goods and services.
- The most dangerous among spam messages are phishing, pharming and scamming ones. Nigerian scams, lottery and casino scams, fraudulent messages from banks and credit organizations are characteristic of them.
- Next come black political and economic PR scams and the so-called “letters of happiness”.
- There is also a technical spam, or bounce messages, generated by mail servers in reply to undelivered message, whether you did send one or not. Such e-mails might emerge as a result of mail server poor work or virus activity, of some e-mail worm, for instance.
Dr.Web Firewall
Do I need to disable Windows Firewall when installing Dr.Web Firewall?
If you install a Dr.Web package that includes the firewall, you will be prompted to deactivate the Windows firewall. The Windows firewall must be disabled, doing otherwise will result in numerous conflicts that can cause errors or an OS crash.
Neither it is recommended to enable the Windows firewall while the Dr.Web firewall is working.
How can I create an application (program) rule in Dr.Web version 8 and earlier?
Right-click on the Dr.Web icon in the notification area. In the menu, hover over the Firewall item and in the drop-down list, select Settings. Click the Application tab.
To create an application rule, click Create. In the opened window, specify the path to the executable file for the program for which you are creating the rule, and select
- the rule type for launching network applications:
- Allow — to allow the application to launch processes.
- Block — to block the application from launching processes.
- Not configured — to customize the selected firewall operating mode for this application.
- and the rule type for accessing network resources:
- Allow all — the application will be permitted to access the network.
- Block all — the application will be blocked from accessing the network.
- Custom — access will be determined by the parameters specified.
- Not configured — to customize the selected firewall operating mode for this application.
You do not need to configure rules manually if the firewall is operating in the training mode — it is easier to configure access for each application right from the firewall notification window when it attempts to connect to the network for the first time.
How do I disable the automatic launch of the firewall at Windows startup?
You can't disable automatic startup for the firewall with standard tools available in the system.. However, you can disable temporarily various anti-virus modules including the firewall at any moment. Right click on the Dr.Web icon in the system tray and select Firewall-> Disable in the context menu.
Note: If the Disable item is not available in the menu, switch to the Administrative mode.
I'm getting messages about new network rules created again and again. How can I disable the notifications?
Dr.Web Firewall in the real time mode creates rules for applications running in the system but are not on its list. Therefore, you must create rules for such applications when they attempt to connect to the network for the first time. A connection request is issued for specific ports and protocols utilized by the application. You can allow all the requested connections, a connection only for a specific protocol and port, or block the connection. Once the rule is created, the firewall handles requests according to the rule and no longer gives out messages regarding application's network activity to the user.
The predefined database contains rules for the most popular programs, as well as all Windows system services and applications. The database is updated on a regular basis.
For more information see the video tutorial on configuring the Dr.Web firewall.
What firewall operational modes are available?
Dr.Web Firewall has four operating modes:
- Allow unknown connections — all unknown connections are allowed. Protection is not active.
- Training mode (create rules for known applications automatically) — learning mode. Rules for known applications are created automatically. The user will be prompted to choose what action to take with all unknown connections.
- Interactive mode — learning mode. When the operating system or an application attempts to connect to a network, the firewall will prompt the user to choose an action.
- Block unknown connections — all unknown connections will be blocked without prompting the user.
Che cos'è il firewall?
Firewall (in inglese "muro tagliafuoco") — programma che controlla lo scambio di dati tra il computer e il resto della rete. Il firewall ha l'obiettivo principale di monitorare l'attività di rete generata dalle applicazioni e prevenire i tentativi degli hacker o dei programmi malevoli di inviare qualche informazione dal computer nella rete o viceversa di accettare senza autorizzazione un'informazione da una fonte remota.
Che cos'è la modalità interattiva del firewall?
In questa modalità è possibile addestrare il firewall alla reazione a un tentativo di accesso alla rete da parte di un programma.
Quando rileva tentativi di accesso a risorse di rete, il Firewall Dr.Web controlla se le regole di filtraggio sono impostate per questi programmi. Se non ci sono le regole, il firewall visualizza una richiesta in cui l'utente può selezionare un'azione da applicare una volta o può creare una regola in base a cui il firewall elaborerà in seguito la simile attività di rete dell'applicazione.
Il firewall ha bloccato l'accesso a Internet. Cosa fare?
Se il Firewall ha bloccato l'utilizzo della rete, è necessario effettuare le seguenti operazioni.
-
Per resettare le impostazioni, fare clic sull'icona Dr.Web nella tray, aprire nel menu dell'antivirus la voce Centro sicurezza, fare clic sull'icona
 nell'angolo inferiore sinistro della finestra e quindi su
  nell'angolo superiore destro. Nella finestra che si è aperta, nella sezione Gestione delle impostazioni selezionare Modifica → Ripristina impostazioni predefinite e fare clic su OK.
Attenzione! Quando si esegue questa operazione, verranno resettati i parametri personalizzati di tutti i componenti Dr.Web, sarà necessario configurarli nuovamente.
Successivamente, al tentativo di accesso a Internet possono comparire le richieste dal Firewall (quelle per creare una regola, vietare una volta, consentire una volta). Creare le regole di permesso per le applicazioni desiderate cliccando sul pulsante Crea regola → Consenti → OK.
Per maggiori informazioni sull'addestramento del Firewall consultare la documentazione
-
Contattare il servizio di supporto tecnico allegando un report creato dall'utility DwSysInfo.
Per creare il report:
- Scaricare e salvare sul computer l'utility: https://download.geo.drweb.com/pub/drweb/tools/dwsysinfo.exe
- Eseguire il file salvato dwsysinfo.exe.
- Premere il pulsante Genera report.
- Attendere la fine della generazione del report.
È comparsa una finestra di avviso del firewall. Cosa farne?
La comparsa di una finestra di avviso indica che per l'applicazione a cui ha reagito il firewall non è impostata alcuna regola di elaborazione. Si può procedere in uno dei seguenti modi:
- Consenti una volta — l'attività di rete dell'applicazione sarà consentita per il tempo della sessione corrente. Dopo il riavvio del computer o dopo un'altra invocazione del programma, la richiesta del firewall verrà visualizzata di nuovo.
- Vieta una volta — divieto dell'attività di rete del programma. Solo per la sessione corrente.
- Crea regola — quando viene configurata una regola per l'applicazione, il firewall funzionerà automaticamente in base a questa regola. Selezionando questa voce, si vedrà una finestra in cui sarà proposta la scelta dell'azione:
- Consenti all'applicazione le connessioni di rete sulla porta *numero di porta*
- Proibisci all'applicazione le connessioni di rete sulla porta *numero di porta*
- Consenti all'applicazione tutte le connessioni di rete
- Proibisci all'applicazione tutte le connessioni di rete
- Crea una regola personalizzata — è possibile creare una nuova regola in base a cui il firewall elaborerà il programma corrente.
Nota. Cercare sempre di creare regole per automatizzare il funzionamento del firewall.
Come creare una regola per un'applicazione (un programma)?
Per vietare a un determinato programma l'utilizzo della rete, è necessario creare una nuova regola. Fare clic sull'icona Dr.Web nella barra delle applicazioni, selezionare Centro sicurezza → File e rete e fare clic sull'icona ![]() .
.

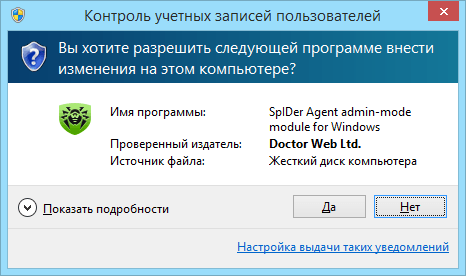
Quando compare la finestra controllo account utente, premere il pulsante Sì e, se necessario, inserire la password dell'amministratore.
Selezionare la sezione Firewall diventata attiva e fare clic su Modifica nella voce Regole per applicazioni.
Nella finestra che si è aperta fare clic sull'icona ![]() per aggiungere una nuova regola.
per aggiungere una nuova regola.
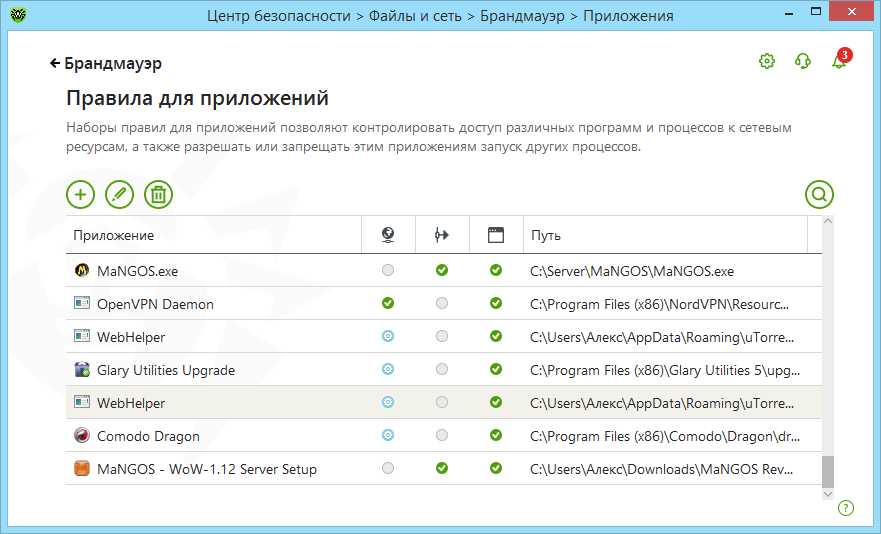
Nella finestra successiva indicare il percorso del file eseguibile di un'applicazione, dalla lista a cascata Avvio delle applicazioni di rete selezionare l'azione richiesta:
- Consenti — al tentativo di avvio dell'applicazione di rete il firewall consentirà questa operazione.
- Blocca — al tentativo di avvio dell'applicazione di rete il firewall vieterà questa operazione.
- Non impostato — al tentativo di avvio dell'applicazione di rete il firewall visualizzerà una richiesta.
Quindi selezionare l'azione richiesta dalla lista Accesso alle risorse di rete:
- Consenti tutto — sarà consentita qualsiasi attività di rete del programma.
- Blocca tutto — sarà vietata qualsiasi attività di rete del programma.
- Personalizzato — è possibile configurare manualmente tutti i parametri di utilizzo della rete da parte del programma.
- Non impostato — ogni volta che il programma tenta di accedere alla rete verrà visualizzata una richiesta.

Fare clic su OK per rendere effettive le modifiche.
Se il firewall funziona in modalità interattiva, non è necessario configurare le regole manualmente — è più facile configurare l'accesso di ciascuna applicazione al momento della sua prima attività di rete direttamente dalla finestra di avviso del firewall.
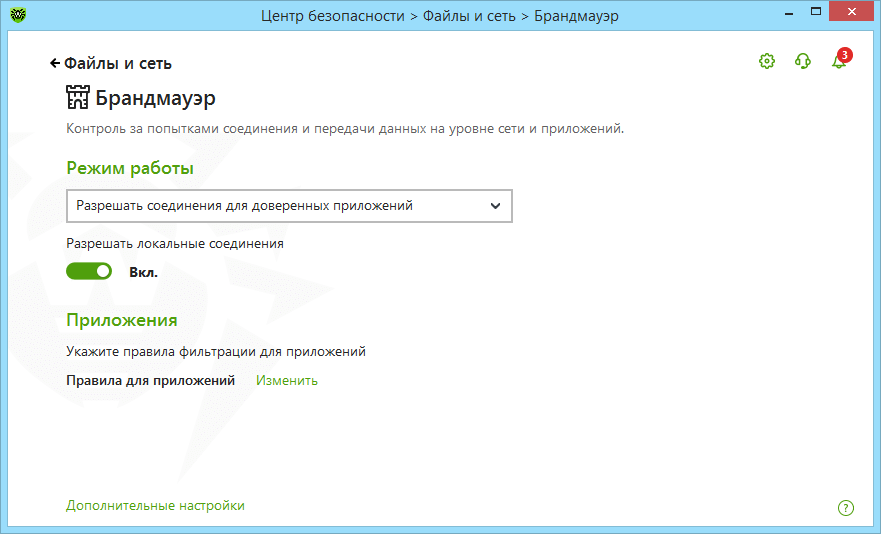
Come disattivare il firewall?
Fare clic sull'icona Dr.Web nella barra delle applicazioni, selezionare Centro sicurezza → File e rete e fare clic sull'icona ![]() . Quando compare la finestra controllo account utente, premere il pulsante Sì e, se necessario, inserire la password dell'amministratore.
. Quando compare la finestra controllo account utente, premere il pulsante Sì e, se necessario, inserire la password dell'amministratore.
Quindi spostare l'interruttore di fronte al componente Firewall diventato attivo — la sua cornice diventerà rossa.

Come resettare le impostazioni del firewall?
Per resettare le impostazioni, fare clic sull'icona Dr.Web nella tray, aprire nel menu dell'antivirus la voce Centro sicurezza, fare clic sull'icona ![]() nell'angolo inferiore sinistro della finestra e quindi su
nell'angolo inferiore sinistro della finestra e quindi su ![]() nell'angolo superiore destro. Nella finestra che si è aperta, nella sezione Gestione delle impostazioni selezionare Modifica → Ripristina impostazioni predefinite e fare clic su OK.
nell'angolo superiore destro. Nella finestra che si è aperta, nella sezione Gestione delle impostazioni selezionare Modifica → Ripristina impostazioni predefinite e fare clic su OK.

Attenzione! Quando si esegue questa operazione, verranno resettati i parametri personalizzati di tutti i componenti Dr.Web, sarà necessario configurarli nuovamente.
In quali modalità può funzionare il firewall?
Il firewall ha tre modalità di funzionamento:
- Consenti connessioni sconosciute — tutte le connessioni sconosciute sono consentite. La protezione non è operativa.
- Consenti connessioni per le applicazioni affidabili — le regole per le applicazioni conosciute (con una firma digitale valida) vengono applicate automaticamente. Per tutte le connessioni sconosciute il firewall mostrerà all'utente una richiesta di scelta dell'azione.
- Modalità interattiva — la modalità di training. Al tentativo di attività di rete del sistema operativo o delle applicazioni il firewall mostrerà all'utente una richiesta di scelta dell'azione.
- Blocca connessioni sconosciute — tutte le connessioni sconosciute verranno bloccate senza mostrare alcuna richiesta all'utente.
La modalità di funzionamento può essere configurata nelle impostazioni del firewall. Se per un'applicazione è già impostata una regola, il firewall agirà conformemente a questa regola.
Che cos'è il processo padre?
Processo padre — un processo o un'applicazione che può avviare altre applicazioni. Le regole per i processi padre possono essere configurate nella finestra di creazione o di modifica di una regola per un'applicazione tramite la lista a cascata Avvio delle applicazioni di rete.
Come configurare le regole per le connessioni di rete?
Fare clic sull'icona Dr.Web nella barra delle applicazioni, selezionare Centro sicurezza → File e rete e fare clic sull'icona ![]() . Quando compare la finestra controllo account utente, premere il pulsante Sì e, se necessario, inserire la password dell'amministratore.
. Quando compare la finestra controllo account utente, premere il pulsante Sì e, se necessario, inserire la password dell'amministratore.
Selezionare la sezione Firewall diventata attiva e fare clic su Impostazioni avanzate. Nella sezione Parametri di utilizzo per le reti conosciute fare clic su Modifica. Nella finestra che si è aperta per ciascuna delle connessioni di rete è possibile indicare un set di regole preimpostate:
- Allow all — tutti i pacchetti vengono consentiti.
- Block all – tutti i pacchetti vengono bloccati.
- Default rule — le regole che descrivono le configurazioni di rete e gli attacchi più comuni (vengono utilizzate di default per tutte le interfacce).
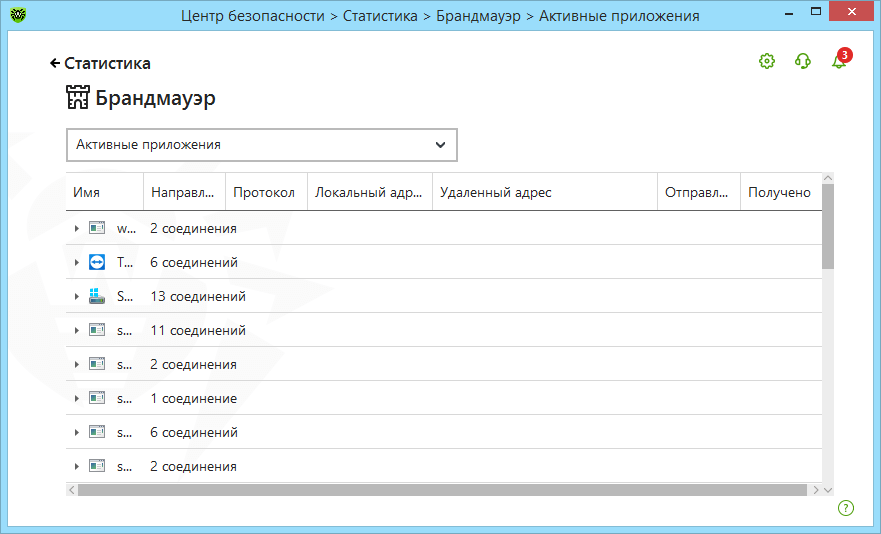
Come visualizzare il report del firewall?
Fare clic sull'icona Dr.Web nella barra delle applicazioni, selezionare Centro sicurezza → Statistiche → Firewall.
Che cos'è il filtro pacchetti?
È un elemento del firewall che consente di gestire il passaggio del traffico attraverso i protocolli indicati consentendo o vietando il trasferimento di pacchetti che soddisfano le condizioni impostate. Il filtro pacchetti è uno strumento di base per la sicurezza del computer, che funziona indipendentemente dalle applicazioni.
Posso installare il Firewall Dr.Web senza installare l'antivirus?
Il Firewall Dr.Web è un componente del software Dr.Web, e non è possibile installare il firewall senza installare l'antivirus.
Che cosa significa il messaggio "La firma digitale — Sconosciuto" quando un'applicazione tenta di accedere ad Internet? Che cos'è una firma digitale e su che cosa influisce?
La firma digitale — un codice che attesta che un programma è stato ottenuto da una specifica fonte e non è stato modificato. Tuttavia, un'applicazione firmata non è necessariamente sicura, perciò l'utente dovrebbe essere attento quando installa qualsiasi software, persino uno firmato.
Un'applicazione sconosciuta cerca di continuo di accedere ad Internet. Cosa può essere e cosa fare in questo caso?
Probabilmente, è un programma malevolo. È consigliabile eseguire una scansione completa del sistema tramite lo scanner antivirus Dr.Web.
È necessario configurare il filtro pacchetti per un computer di casa?
A casa, quando è necessario proteggere dagli attacchi di rete soltanto un computer, non è richiesta la configurazione del filtro pacchetti. Il fatto è che una parte notevole delle regole è contenuta nel database del firewall, e queste regole vengono attivate secondo necessità. Se per una situazione non c'è alcuna regola, il firewall visualizzerà una richiesta di azione.
SpIDer Guard
Can I temporarily disable SpIDer Guard with no need to reboot my PC?
Yes, you can. In order to disable SpIDer Guard, right-click on the Dr.Web icon in the notifications area and select SpIDer Guard–>Disable.
How can I add an exclusion for the SpIDer Guard scan?
In order to exclude a program or file from the SpIDer Guard scan, right-click on the Dr.Web icon in the notifications area and select SpIDer Guard–>Settings. In the next window, proceed to the Exclusions tab, press the Browse button to select the folder where the program to be excluded from the scan is installed, and press Add.
Should it become necessary to exclude a folder or file while the Dr.Web for Windows Scanner is running — select Settings–>Modify settings in the scanner menu. You may add a folder in the Scan–>Excluded paths list tab, and a certain file in the Excluded files list, then you need to press Add.
Quali azioni Dr.Web permette di eseguire sugli oggetti malevoli?
Al rilevamento da parte dell'antivirus Dr.Web di un programma malevolo, ad esso può essere applicata una delle seguenti azioni.
Cura — si può provare a ripristinare il file infetto allo stato originale.
Nella maggior parte dei casi la voce "Cura" sarà inattiva. Questa azione è possibile solo per gli oggetti infettati da un virus curabile conosciuto, esclusi i trojan e i file infetti all'interno degli oggetti composti (archivi, file di email o container di file).Rimuovi — per rimuovere definitivamente l'oggetto malevolo (file, script, allegato email ecc.).
Sposta in quarantena — se per qualche motivo si vuole mantenere il file (per esempio, per inviarlo al laboratorio dei virus Doctor Web), si può spostarlo in una cartella di quarantena protetta da cui esso non sarà più in grado di danneggiare il PC.
Ignora — per non eseguire alcuna azione. Questa voce può essere selezionata solo se si è completamente sicuri che il rilevamento è un falso positivo.
Limitazioni alla neutralizzazione delle minacce:
è impossibile la cura degli oggetti sospetti (cioè presumibilmente infetti o contenenti codice malevolo);
è impossibile lo spostamento o la rimozione degli oggetti che non sono file (per esempio, settori di avvio);
è impossibile qualsiasi azione per i singoli file all'interno di archivi, pacchetti di installazione o come parte di email — l'azione in tali casi viene applicata solo a tutto l'oggetto per intero.
What are the SpIDer Guard functions?
Anti-virus guard is loaded into RAM and checks files being created or modified on the hard disk and all the files being opened on network disks and removable media “on the fly”.
Besides, SpIDer Guard constantly traces running processes activities specific to viruses and blocks those processes upon their detection.
Upon detection of infected objects, SpIDer Guard interacts with them according to the specified settings.
What does “Optimal mode” mean?
In the Optimal mode the guard scans only files being launched, created and modified on hard disks, removable media and network disks.
What does “Paranoid mode” mean?
Paranoid mode is an enhanced protection mode. When this mode is activated, the guard starts scanning all the files being opened, created or modified on hard disks, removable media and network disks.
What is Prohibit Host system file modification option used for?
Enabling this option allows to block attempts to modify HOSTS system file used by operating system to make an Internet access easier. Modifications of this file may be resulted in virus or any other malicious program activities, and this may cause loss of access to some websites or network resources as a whole.
What is the function of the Block removable media autorun option?
Enabling this option allows to block automatic launch of autorun.exe-like files from removable media and hard disk drives. This option is used to neutralize autorun-viruses, which are automatically activated when a device is connected to the PC with autorun option enabled.
Where is SpIDer Guard log located?
SpIDer Guard log file is called spiderg3.log and located in the anti-virus installation folder (by default, it is C:\Program Files\DrWeb).
SpIDer Mail
How can I test SpIDer Mail performance?
You can test proper operability of anti-virus programs detecting viruses by their signatures with the use of EICAR (European Institute for Computer Anti-Virus Research) file.
This program is specially designed to allow you to see how the installed anti-virus will alert you to the viruses it detected, with no need to expose your PC to danger. Eicar program is not malicious but is specially tuned so that most anti-viruses treat it as a virus. Dr.Web refers to this “virus” as EICAR Test File (Not a Virus!).
To test mail anti-virus performance, you can ask a friend of yours to send you this file, or otherwise try to send it to yourself. If SpIDer Mail detects a virus — that is OK.
Which addresses shall I use to send letters to if misrecognized as a spam / not spam?
If the spam filter misrecognizes some letters, they can be forwarded to special mail addresses for analysis and improving filter performance quality:
- Send letters misrecognized as a spam to nonspam@drweb.com.
- Send letters not recognized by mistake as a spam to spam@drweb.com.
Important! You should forward messages as attachment, not as inline.
Utilizzo la mia posta attraverso il browser. Il componente SpIDer Mail esegue il controllo antivirus e antispam dei messaggi di posta?
Il controllo dei messaggi di posta viene effettuato dal componente SpIDer Mail solo se viene utilizzato un client di posta locale (come ad esempio, MS Outlook, Mozilla Thunderbird o altro). Ed inoltre, il controllo viene effettuato al momento del download della posta sul computer e non al momento della visualizzazione della lista dei nuovi messaggi presenti sul server quando essi potrebbero non essere stati ancora scaricati fisicamente dall'utente e, di conseguenza, non sono stati controllati a questo punto.
Se la posta viene utilizzata attraverso il browser, essa non viene scaricata sul computer locale, ma invece viene “rispecchiata” dal browser in base ai messaggi presenti sul server remoto. In assenza di un messaggio completamente scaricato, non è possibile eseguire il controllo del messaggio. Tuttavia, qualsiasi allegato del messaggio che verrà salvato sul disco del computer verrà controllato tramite il componente SpIDer Guard.
Nothing found